This is part of my Image Conversion Workflow.
Assigning good keywords in Adobe Lightroom is probably the single most important task to accomplish. Even after only cataloging 300 images, I would be lost trying to locate images without being able to use keywords.
I will address the organization of keywords in a later article. Today, I will address the different ways to assign keywords to an image. These methods are as follows:
- Dragging images to the keyword
- Dragging keywords to the image
- Typing and editing the images’s keyword list
- Assigning keywords at import
Dragging Images to a Keyword
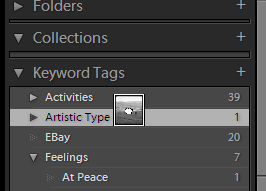
Dragging photos to keywords or vice-versa is an easy method to use for assigning keywords. You can choose to assign a single image or multiple images to a keyword. To assign multiple images the same keyword use the or keys (PC) to select some images. Then, starting with the mouse cursor in the middle of the image, drag one of the images and drop it over the keyword you wish to assign. Note that the keyword list is on the left in the library view. The same is true if you want to only assign one image to a keyword. See the picture to the left showing a keyword highlighted to assign to an image.
Dragging Keywords to Images
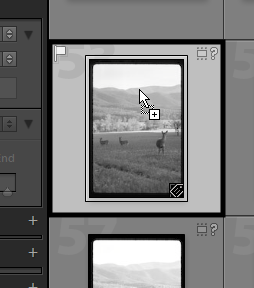
The other method is to select one or more images, the same as in the previous paragraph. Then, click on a keyword and hold the mouse button down. Drag the keyword to the center of one of the images in the selection and let go. The mouse cursor should have a plus sign beside it like the picture to the left. If more than one image is selected, all the images receive the keyword assignment.
Typing Keywords in the Keywording List
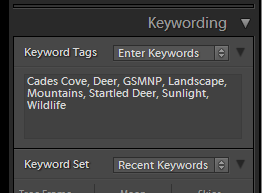
The third method of assigning keywords is to type them directly into the keywording dialog box. You can add existing keywords or by typing a new word can create a new keyword on the fly. If you have keywords that are nested or have a hierarchy, which I highly recommend, then typing them in is a little different.
Assume that you have a keyword called ‘Deer’ that is a member of the ‘Animal’ keyword group which is a member of the ‘Nature’ keyword group. The hierarchy is as follows: Nature -> Animals -> Deer. To type in this keyword, use the reverse hierarchy, as follows: Deer > Animals > Nature. This will allow the assignment of the layered keyword.
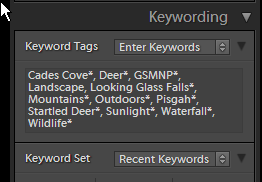
Notice the keywording dialog box can also contain asterisks (*). This occurs if more than one image is selected and some of them contain different keywords. For example if you have a waterfall image selected and a image of some deer and the waterfall image contains the keyword ‘Waterfall’ while the deer image does not, then you will see the ‘Waterfall’ keyword followed by an asterisk ‘*’ as follows: ‘Waterfall*’.
If you delete the asterisk, then the keyword is added to ALL pictures in the selection. This can be helpful if you have a group of pictures that should have the same keywords, but not all share the same keywords. Assign the keywords by removing the asterisks in the keywording box. Again, simply removing the asterisk from any keyword in the keywording box will assign that keyword to all images currently selected. The remaining keywords will stay as they are.
Importing Images with Keywords Assigned
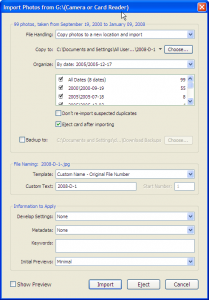
Finally, importing images also presents an opportunity to add keywords. While keywording templates are beyond the scope of this article, templates offer an easy way to assign information used on a repetative basis to images as they are imported. Below you see the ‘Import from Devices’ dialog box. Notice the section at the bottom of the dialog.
It has a blank allowing you to input keywords. All images being imported will be assigned these keywords. Once again, if the keyword does not exist, Lightroom will add it to the keyword library for you.
Conclusion
These are the methods for adding keywords to your images in Adobe Lightroom. Keywords are exactly that: key to finding your images. Even as a hobbyist, you will gain a large number of images and searching through them takes far more time than searching a database of keywords. Your savings will be directly related to the amount of forethought you put into designing your keyword structure.
I will write some additional articles on keywords including the following: keyword templates, creating keyword hierarchies and the importance of multiple keywords for each image.
Ross
so, you can’t add the lower rank key word and have it’s nested hierarchy automatically understood by lightroom? (i.e., every time I put in a picture of my son max, I’m going to have put in People>Family>Sam ?
Outdoor Images
In LR 1.3x I had issues with inputting keywords without the hierarchy, but I had a large list of extremely nested keywords.
In LR 2.x I have not had those issues, so no in your case you could input ‘Sam’. However, be warned that ‘Sam’ and ‘sam’ are two different keywords.
I have tested in LR 2.1 with two keywords: sam and Sam > Kids. If I just assigned ‘Sam’ to an image, then it automatically found the hierarchy.
Also, remember that you can select more than one image at a time and assign keywords in bulk.