This is a loaded question depending on who you speak with. Some are tied to brands and some to focal lengths. The purpose of this discussion is to figure out what weaknesses a typical lens has and which of those weaknesses may be most important to have fixed. Finding a lens that accomplishes these things should then be a great lens. The featured image for this article was taken with, what I consider, a great lens. However, this lens has multiple aberrations.
One of the problems with digital photography is the ability to chimp, or view each image after the shutter has been pressed. While this can be a great feedback tool for learning more about photography, the camera quality can cause problems in image evaluation. Many cameras have inferior screens on the back and an image that seems exposed just right and is very sharp, could in fact be overexposed and blurry. Both my Leica Monochrom and Leica M240 have good LCD screens on the back. However, in bright sunlight, my images always seem underexposed on these LCD screens. When back inside and reviewing, the exposures are typically spot on.
Trusting my ability to set exposures with light meters and adjust to surrounding light conditions pays off when I ignore the LCD screen on the back and trust my instincts. So, not only using a well designed lens, but proper focusing and exposure will help get past this problem of getting home to find out the photo shoot was a bust and everything has just a little shake or not enough contrast. Interestingly enough, the same applies to film photography!
First, we should discuss some of the problems inherent in lens design. To start off, I should tell you that Erwin Puts has some fantastic writing and resources regarding the history and theory of lens design. I am trying to condense his extremely thorough volumes to a mere few paragraphs. If you want to dive deep into the workings of lens theory, I encourage you to read his works.
Let us consider the following lens aberrations, also know as the five Seidel aberrations:
- spherical aberration
- coma
- astigmatism
- field curvature
- distortion
There are two additional aberrations commonly discussed which affect many wavelengths of light at the same time. These are called chromatic aberrations and include both longitudinal and lateral versions.
The five aberrations above are termed monochromatic. Additionally, as Erwin Puts explains in his third edition of “Leica Compendium – Companies, Cameras, Lenses,” the first three of the monochromatic aberrations can be classified as sharpness errors while the last two as positioning errors. These aberrations are present in every lens design.
One of the many challenges for a lens designer is to reduce these aberrations as much as possible, while still maintaining the quality of the desired lens, both in manufacturing terms and in photographic terms. While many lenses in the market today produce extremely sharp images at, say f/5.6, the challenge is wide open apertures and bright light sources. Wide open apertures mix all the lens aberrations into a toxic soup and splatter them on the image.
In addition, bright light sources frequently cause problems in edge sharpness and light pollution throughout an image. Stopping down more tends to lessen the problems aberrations cause, until diffraction sets in for very small apertures. A balancing act, indeed.
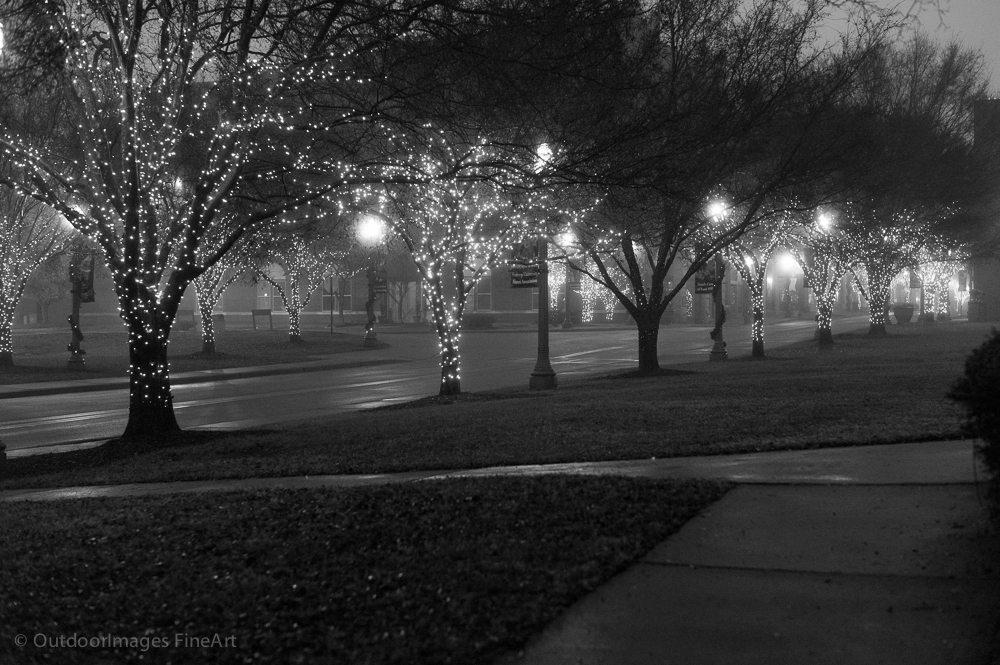
Spherical aberration has to do with where the light rays focus when going through a lens for an image in the center. Take a bright light source, like a christmas light decorating an outside tree, much like the one below. To accurately represent the small light source, it must go through the large opening of the lens and be focused to the same small point as the light started from. In reality, the light going through the center of the lens may be relatively unchanged, but the light entering the edge of the lens has many more curves and bends to go through before hitting the plane of focus. Those light rays may not hit near the center of the lens, causing the image to be a little out of focus. The further these rays focus from the center, the more the image is blurry (less sharp). The lens used below has excellent correction for spherical aberration and the lights are represented as sharp points (Leica Summilux-M 35mm ASPH f/1.4 FLE).
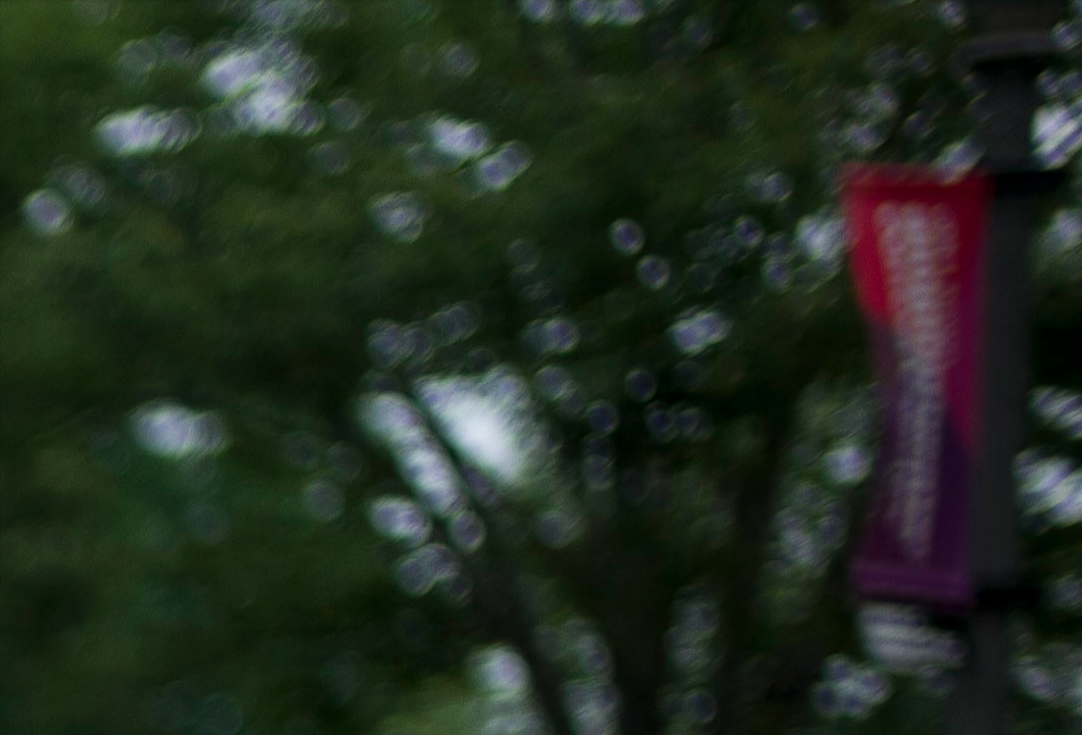
Note that this aberration can be countered somewhat by stopping down the lens. This simply causes light to be used for the image that is closer to the center, ignoring the light at the edges that is halted at the f/stop diaphragm. The f/stop simply hides the aberration, it does not improve or fix the lens, only the quality of the light used for the image. I use a Leica Elmarit-M 50mm f/2.8 collapsable lens for some walk-around photography in Rock Hill, SC. This lens is extremely compact, very quick to focus, but has strong spherical aberration.
See the out of focus areas in the image above where the circles are dark in the middle and bright on the outside. This is a hallmark for spherical aberration.
Coma is a similar aberration except that the image to evaluate is at the outer edge of the lens. The same concept as spherical aberration is considered – light goes through the edge of a lens to a point at the edge of the photograph. Then, light enters the other edges of the lens and the center, but must angle up to the corner where the point is focused. This aberration typically causes much wider dispersion of light and is typically easier to distinguish in a lens.
Notice the Coma in the image above (it is actually a mix of astigmatism and coma). A classical lens was used (the Leica Noctilux-M 50mm f/1.0). As you look up towards the top of the tree, you can see the points of light begin to change to a fan and then to a bird. This effect is present even in very well designed lenses like the Leica lens. While a more robust design might correct for it, during the 1978-2008 period this lens was available, there was no other 50mm lens with an f/stop of 1.0. The trade-off for the f/stop was Coma. However, the value includes the bokeh. See the way the out of focus points of light show up in the image below. They lend a very unique character to this image taking on the likes of a gold coin.
Field curvature and distortion can appear similar, but are very different. Field curvature represents the focal plane of the image. In field curvature, the outer parts of the image focus closer to the lens than the central parts of the image. This causes the focal plane to curve inward and is the result of an incorrect convex lens property.
Distortion, however, is very different. There are two main types of distortion – barrel distortion and pincushion distortion. Barrel distortion takes a square grid, and makes it look like a barrel, like the middle is pushing out from the focal plane. Pincushion is the opposite, making the image look like the center is pushing in past the focal plane.
The difference between field curvature and distortion in the visible image is subtle. The distorted image is still in focus and is in a flat focal plane. However, the straight lines are changed into curved lines through the properties of the lens and glass. Even though the lines are changed into curves, they still focus at the same point as the rest of the image.
Think of the field curvature as a focal plane that is distorted (front and back) while the image is faithfully reproduced, albeit out of focus. Think of a distortion as the image that is distorted (left and right) along the focal plane and still in focus.
An advantage of distortion is that the image can be adjusted using software and the curved lines straightened again. A small amount of the edges in the image will be lost, but the image can be corrected nonetheless. Field curvature, since it is out of focus, is much more difficult to fix because blurry areas must be defined and given sharper contrast to emulate the sharp lines of focus. This is much more difficult to fix using standard photograph editing software.
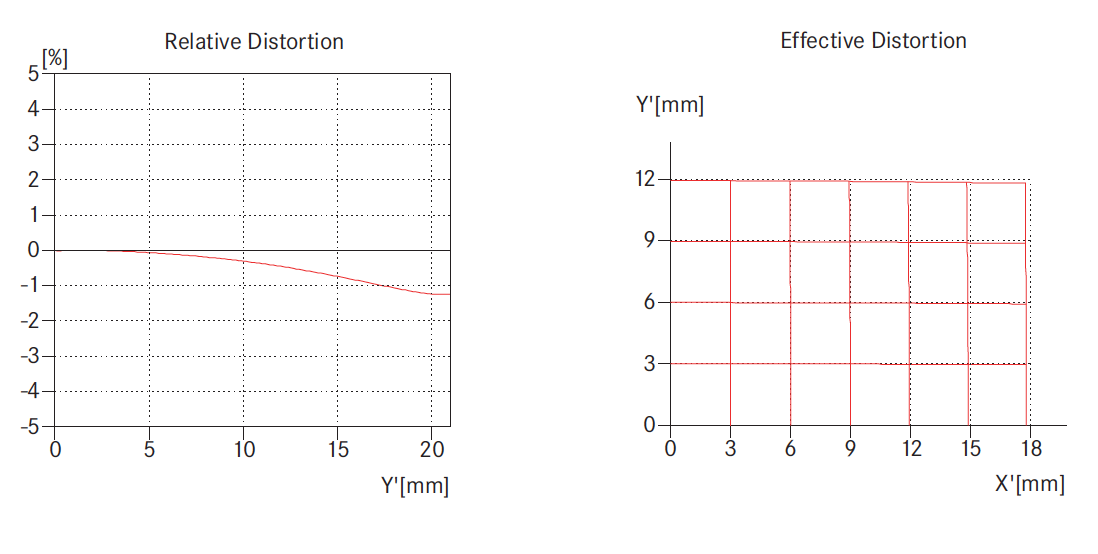
Leica publishes the distortion for each of its lenses and has a partnership with Adobe Lightroom to create lens profiles that automatically apply distortion fixes. Below is a copy of the distortion published by Leica Camera AG for the Noctilux f/1.0.
One question worth asking at this point is whether this Noctilux is a great lens given the aberrations that show up in some images. The real answer is that it depends. Without appearing to be a lazy answer, the problem is that every lens has some level of aberrations. The larger the f/stop and more light gathering power, the more severe are typical aberrations.
The analysis required is that of the image. Taking images in harsh light, low light, contrasty light, points of light and backlit subjects all provide opportunities to evaluate the look of the lens. This is also known as the “fingerprint” of the lens or “character” of the lens. Here the lens designer removes certain aberrations while calculating how to work within other aberrations. This is no easy feat.
Allowing some aberrations and capitalizing on the strengths of the resulting image provides for a great lens. Correcting the nauseating aberrations so they do not distract from the image provides a great lens. Finally, having a well corrected lens profile for software usage, helps some aberrations like distortion all but disappear.
Personally, I love the Leica M lenses that provide artistic aberrations with a maximum amount of contrast to provide sharp edges where needed and soft blurry lines where not needed. Great camera lenses indeed!


