There are three ways to mark images in Lightroom. Each method serves a different purpose and each method should be used in succession.
Using colors is the third method of three highly selective systems available in Lightroom to mark pictures for later selection. Using colors is best used as the last step in the image marking workflow. While flags determine if the image is worth saving, stars determine how good the image really is. Colors determine the status of the image before being released.
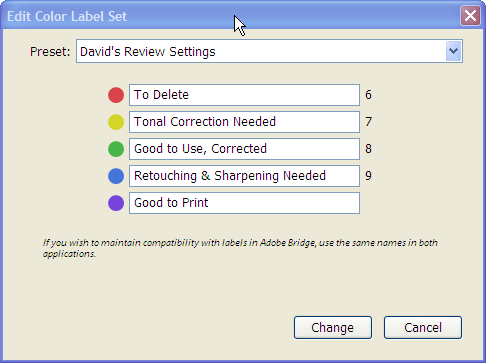
Color label settings
Colors can be used for any custom marking. I prefer to use color labels to let me know the edit status of the image and if it is ready to print or use in a slide show.
I left the descriptions very similar to the standard ones provided by Adobe to provide an easy transition. This will help explain the fact that the colors are not presented in the order of the workflow.
Some of the colors should be intuitive. Red means stop. Green means go. Thus, Red stands for a pending delete and Green stands for Good to Use, Corrected. I also use Purple for Good to Print and Yellow and Blue for touchups. Yellow means caution, needs Tonal Corrections. Typically the Blue layer in a color photo is where the noise is which needs removed to sharpen the image. Thus, the Blue color is used to indicate Retouching & Sharpening are Needed.
Why use a pending delete color when we have a rejected flag available for use? As you see in the referenced article, I use rejected for images that are clearly poor or accidental exposures. These I delete quickly. I also indicated that I pick images that look reasonable for further looks. This leaves some images that are not picked and some that may remain at a single star while others climb the rating ladder.
As I keep reviewing photos, I may have some severe duplication and want to slim down the image library. Since I’ve already backed all the images up, I may mark them to delete later and continue working. Every now and then I may review the images to delete and remove them from the library. The key is this: I am slow to remove images permanently from the library, so I want to review them for awhile to be sure.
This is why I use the Red color for deletion. Now, your next question might be why use Green as good and Purple as good to print. These two steps are mutually exclusive in my opinion.
Green indicates a picture has been fixed, retouched, sharpened, toned and generally set the way I invisioned the finished print. This means the image is ready for a slide show or to put on the web. However, printing is another story. Typically, you need additional fine tuned sharpening prior to printing. You may even need to adjust the tones slightly depending on the paper type being printed to. In Photoshop I even have separate layer groups for each type of paper I use. I can turn the layer on or off depending on what paper I am printing to. This allows me to set the tonal qualities different for the contrast range of each paper.
A Purple image in my workflow can either be a virtual copy specially setup for printing or a green image that I have tested and prints well the way it is. Think of purple as being backwards compatible. A purple image can also be used for slide shows and web pages. The image can also be used for printing.
Finally, I break out the retouching and sharpening because I may want to perform these functions, along with any noise removal, outside of Lightroom. Photoshop does a great job using layers for spot touchups. I also like Neat Image’s Noise Removal Program which can be customized with a profile for your scanner or camera. Thus, I mark these images to know they may need work outside of Lightroom. Typically the tonal work can be done within Lightroom so I allow a separate color.
Conclusion
This concludes the three methods used to mark images in Lightroom. Each method is a step in the workflow process. Each step allows you to further define and refine your images. The extra marking ability provides a complete database that can easily be searched no matter how large it becomes.