Be sure to see the overview on Image Sharpening and resources on more information. This article discusses the sharpening tools available in Adobe Lightroom and how to use them effectively.
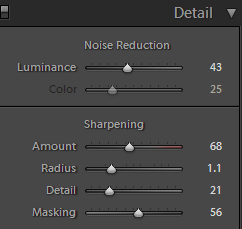 The sharpening tools are found on the Detail panel in the Developing module. You can see on the left they comprised of sliders labeled Amount, Radius, Detail and Masking. Each of these tools has a specific function towards gaining the sharpest image possible. Comparing these tools to the technique developed by Bruce Fraser, this is the content sharpening. The source sharpening, or first layer sharpening is encompassed in this content sharpening with Lightroom. Since Photoshop has layers, it can more easily separate source and content sharpening. Note that the final sharpening or print sharpening is done through the print module and covered in another article. Hence, we now move on to using these tools discussing each one in turn after briefly touching on the interface. We will discuss the Amount slider last as the direct effect on the image is dependent on the other three sliders.
Lightroom Sharpening Tools – Visual Sharpening At Last!
For those users of Photoshop, sharpening had these difficult to define terms. First there is the tool itself – the Unsharp Mask. Then there is this concept called Radius. How do these work together and what is the effect of the results? Enter Lightroom and although the same terms exist, we now have a visual aid to help us see the results, or at least better predict them.
A single most important step when using the Sharpening tools in Lightroom is to use the ALT key when moving the sliders for Radius, Detail and Masking. The ALT key will show a mask on the screen indicating where the effects of the Amount slider will be felt. The mask view generated by using the ALT key is the same as various layer views in Photoshop. The grey background in the Radius and Detail screens show the area unaffected by sharpening. For the Mask, the black area is unaffected. Thus it becomes easy to see which areas of a photo will be enhanced by the sharpening effect.
The Radius Slider
The radius slider indicates how large of an area around each pixel will be considered when performing the amount of sharpening selected in the Amount slider.
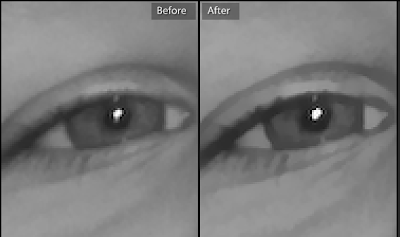
The larger the radius, the coarser the sharpening. Conversely, the smaller the radius the finer the sharpening. This means the larger the radius, the more the contrast. The image above shows a radius of 0.5 (the min) on the left and 3.0 (the max) on the right. Notice on the right hand image how the eyelashes show more contrast, but that the detail is also more lacking. In cases of fine detail levels, a higher radius loses some of those fine details. In cases of wider lines and smoother overall tones without fine details, a large radius may smooth those areas out and add contrast. Typcially, I use a radius value around 1.1 for my sharpening. To see the amount of the radius, press the ALT key and hold it while sliding the Radius slide back and forth. Remember the image must be in the 1:1 or more magnification. This is found on the upper left hand side of Navigator Panel.
The Detail Slider
The Detail slider shows how harsh the grain or pixels will show through on the final image, all based on the Amount slider of course.
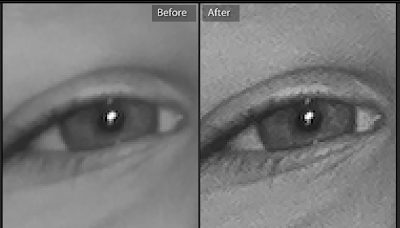
The closer the Detail slider is to 100%, the more of the grain and pixels will show. The closer the Detail slider is to 0%, the less of the sharpening is applied to the area. The image above shows the Detail slider at 0% on the left and at 100% on the right. Notice that the image on the left appears soft and needs some sharpening, while the image on the right has brought back a lot of noise from the image. I typically use a Detail sharpening amout of somewhere near 25%.
The Mask Tool
The Mask tool determines the width of the area around the sharp edges that have sharpening applied. This means you can concentrate a high level of radius and detailed sharpening just around the edges of the image. This would leave the smooth toned areas without edges alone. Since a mask is in effect an overlay of where the sharpening can come through the image, a mask of 0% allows the sharpening affect to be applied to the entire image. Conversely, a mask of 100% allows the sharpening through only the brightest of highlights.
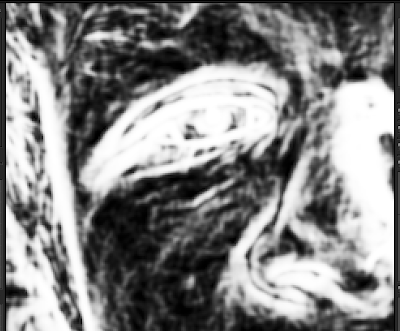
The image above shows a mask set to 25% shown with the ALT key held down. Notice that all around the eye, the pupil and the eyelashes is white, indicating the sharpening affect will blend through 100% based on the Amount, Radius and Detail slider positions. Also notice the sharpening will show through the left side of the face and the hair. This is based on the distinctly contrasty edges of the face and hair tones. Also notice the detail around the nose and the highlight on the right side of the face.
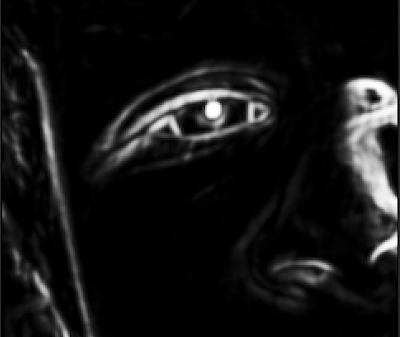
Notice in this image, where the Mask is set to 75% the lower amount of area where the sharpening will come through. The areas marked in white will allows 100% of the sharpening affects to come through; the black areas will be blocked 100% and only the original image will be seen in those areas. Notice the very thin lines around the eye and pupil as well as the eyebrow. Also notice the thin line on the left side of the face and hair. A considerable amount of detail has been removed from the mask allowing a more focused sharpening application. I use varying masks depending on the amount of fine detail in the image and the quality of the image. More often than not, I use a higher mask in the 65% to 85% range.
Applying the Tools
The order the sharpening tools are applied is important to estimate how the image will end up being sharpened. I start by moving the Amount slider to somewhere between 20 and 50 depending on how much sharpening I want to apply. Next, I set the Mask slider based on the image to show a reasonably wide width around the major edges. Next I set the Radius slider to 1.0 or 1.1 and move the Detail slider to somewhere near 20%. The Detail slider is last, so I use the feedback from holding down the ALT key to be sure I’m not adding too much noise back. I don’t worry too much about noise in the soft toned areas as the mask should take them out. Finally, I zoom in and out to some detailed areas to see how they look.
Remember, too much sharpening is not good at this stage of the image processing. More sharpening will be applied at the print stage. Oversharpening in this content stage will only produce an overly contrasty print that has lost significant detail. It should look good on the screen, but not perfectly sharp.
Conclusion
These tools are essentially the same as the photoshop tools. The largest difference is that you can hold the ALT key and SEE how your sharpening will be applied. Choose the order that works for you to produce images sharpened to your liking. Also, don’t forget to work with the preset modules and develop a set of developing presets that you typically apply to an image. This will make your workflow that much more efficient.