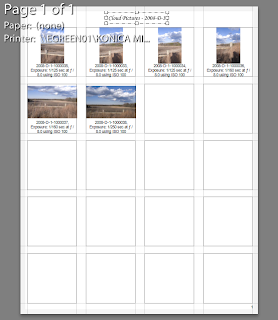
Creating a custom contact sheet like this one is easy to do in Adobe Lightroom. This type of contact sheet is especially important when using our film scanning workflows. We use this contact sheet to easily see what negatives are stored in specific binders allowing easy location of the originals. Here we will show you the steps to create your own contact sheet.
Where to Start
Begin by selecting some images. We use images by selecting a specific file folder where we store our images by either roll of film or roll of slides. See my article on Digital Management of Negatives and Slides.
After selecting some images, move to the print module. There select the lightroom template you wish to start with. We chose the 4×5 Contact Sheet. From there it is all customization.
Customizing the Contact Sheet
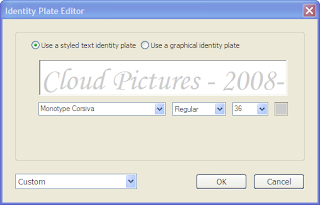
First we will set a title for our work. We need to allow room for a title to show, so we set the top margin in the layout tab to 0.75 inches. You can use any size that fits your needs. Then we set an identity plate that includes, most importantly, the file folder for the images. Remember from our workflow that the folder name is the identification for the series of images. In this case, the folder name is 2008-D-1. You can also use a description for the photo shoot if you like.
To change the identity plate, first select the checkbox for the identity plate under the overlays tab. Then click on the little down arrow at the bottom of the plate sample and select the Edit menu. Select the text identity plate option if necessary and type the description. Simply press the ok button without saving the identity plate, because it will change each time.
Next, select the Override Color checkbox and select a black color for the title. Be sure that the Render behind image and Render on every image checkboxes are turned off. Now you will see the identity plate in the middle of your contact sheet. Using the mouse, drag it to the top of the page. By setting your top margin, you should have ample space to show the title.
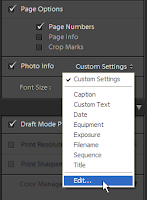
 We also need to add a page number in case there are more images than will fit on a single page. Select the Page Numbers check box under the Page Options after the indentity plate. You should see the number one in the bottom right corner.
 The only customization remaining is the text to show under each image. Check the Photo Info box and select the drop down Edit menu item. Here we will add the standard information we would like to see next to each image on the contact sheet.
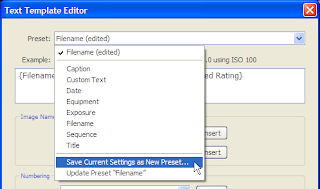
This should bring up a dialog box similar to the one below. We will enter the filename and other information for each image. Note that you can choose whatever information you like, but you should choose the filename first if you will use the contact sheet as part of your archiving and storage workflow. This will help identify frame numbers and filenames later on.
By selecting information that you wish to show and pressing the insert button, the lightroom codes are input to the top and a sample filename is shown. Notice we use the Filename first and then any exposure information linked to the image. If the image is digital, then the exposure information exists. If you are scanning slides or negatives, this information probably doesn’t exist and the filename is sufficient. Notice how we have added labels such as ‘exposure’ in the template area to describe the information added.
 Be sure to press the drop down at the top of the dialog and select the ‘Save current settings as New Preset’ item. Then name it something meaningful like ‘4×5 contact sheet info’. Press Done and see what your preview looks like. It should be similar to the one presented at the top here.
Saving the Preset
 Almost finished! Let’s save what we have so far by adding a template. Press the Add button on the bottom of the left panel and enter a name similar to the one shown here. After you are finished, you can tweak the settings, right-click on the template name and select the ‘Update with Current Settings’ menu item.
Conclusion
Working with digital images from RAW sources or from negatives and slides still necessitates the printing of contact sheets. Set your up like this and easily add it to your work flow.