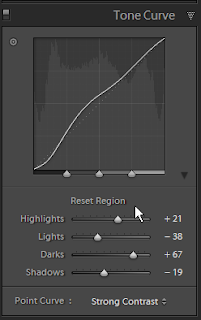
Tweaking development settings in Lightroom is certainly and art and not a science. Somedays certain settings look great and other days the creative part of the brain takes over and we want to adjust an image differently. How do we set all the many sliders back to their default position? See the image below. How did we get the reset option to show?

I have used the reset several times in the tonal curve panel as I try to get the grey tones where I want them. I have also noticed several articles on the web discussing the reset option as it pertains to one panel or another. Thus, I did a test and here are the results.
All of the panels in the develop module have a reset capability. First, hold down the ALT key (Option on a Mac) and hold the mouse cursor over a sub-panel. Notice how the word Reset is inserted in the title at the top. By clicking on this Reset title (Reset Region for example, under the Tone Curve), those settings will be reverted back to the default.
Two items to note: 1) do not confuse this with the RESET button at the bottom of the develop module panels. The RESET button will reset all of the image settings back to default, cropping and the like included. Using the ALT key and clicking on the heading will only reset that small group of settings back to the defaults.
2) The reset option goes back to the default settings, which you can set with the SET DEFAULT button at the bottom of the Develop module panels. To use this button, first make sure all the develop settings are where you want the defaults to be. Then press the ALT key (Option on a Mac) and the RESET button is labeled SET DEFAULT. While the ALT key is held, use the mouse to click on this button saving the defaults.
In an effort to always make our workflow more efficient, the ability to quickly reset some development tweaking and try something new is extremely valuable. Try it until it becomes a habit.