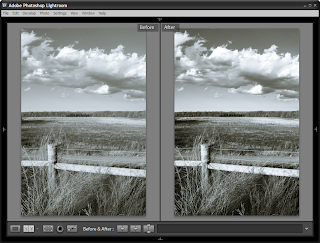
Tonal adjustments are one of the most important tasks in photography. Before digital work it was slow and painful at best; photographers used various grades of paper and filters developing the picture to see the results one at a time. We are getting used to instant gratification with tools like Adobe Lightroom where we can see instantaneously the changes in tones we make to our images. Take a look at the image comparison below.

The photo on the left is without any tonal adjustments. I.e., the tonal curve is a straight diagonal line – no curves at all. The image on the right has a tonal curve that is adjusting the various shades of grey. I use a black and white image in this example because it is much easier to see the affects of changing tones.
Selecting the Proper Tool
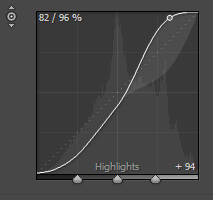
 In order to select a specific tone to modify, use the Tone Selection Tool that is in the tonal curve window. The image to the right is a picture of the little dot or bulls eye. You must click it to activate it. When activated, the tool shows two little arrows one pointing up and one down.
Selecting a Tone to Modify
After you activate the tool, the mouse cursor changes to the same arrowed bulls eye and a plus sign appears. Move the mouse over your image. Notice now in the tonal curve window a small bead or circle is moving up and down the tone line. This dot on the graph represents the tone underneath the plus sign of the mouse cursor.
Thus, select a tone that you wish to modify. It could be adding more detail in the highlights, bringing the highlights up and brighter, adjusting the contrast in a middle tone or shadow and various other tonal work that needs done. After selecting a tone, move the mouse up to lighten the tone and reduce the contrast or move the mouse down to darken the tone and increase the contrast.
 As you slide the mouse up and down over a tone, notice the changes in the tonal curve. You must keep the mouse button pressed for the changes in the image and tonal curve to be shown. Releasing the mouse button sets the contrast and adjustments to that particular value. You will also notice that the area in the tonal curve near the selected tone (the bead on the line) will have a lighter area above and below the line. This is a natural area for the tonal curve to move in either up or down to represent the best tonal changes in a photograph. Lightroom is particularly smart in that you can see the range of values that are changed by moving the curve up and down.
Limitations and Possibilities
While Lightroom has improved the tonal curve significantly over that in use by Photoshop, there are some limitations compared to Photoshop. We will discuss these in detail in another article, but in simple form, Photoshop can have various lock points set along the curve and only the portion of the curve between the lock points will be adjusted. Lightroom has the ability to do this on a small and limited basis which we will also discuss in another article.
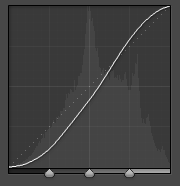
 For now, you can adjust some various tones in your image changing both the contrast and the brightness of the tone. Try this using your image and select and hightlight area and then adjust a shadow area. The tonal adjustments made to image at the top of this article on the right are shown here. Notice that it represents a typical looking S-Curve. However, creating that curve was tailored to this specific image and took no knowledge of physics, light, logarithms or paper characteristics. It only took a visual cue that you wanted to change a specific tone in the image.
Checking for Clipping
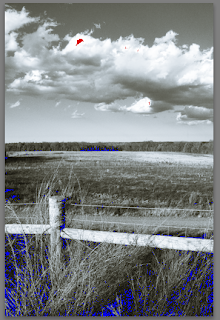
Invariably, after making adjustments to highlights, shadows or a combination of tones near these extremes, clipping may occur in the image. Lightroom has a great feature that helps view clipping so it can be adjusted to your standards. Be sure to do this after any significant tonal adjustments. You can see here that after we made our adjustments to this image, only a minimal amount of highlight and shadow clipping ocurred.
Making Tonal Adjustments More Efficient
To be sure, adjusting tones in a group of photographs is probably the second most tedious work after removing dust and scratches (if you process negatives or slides rather than pure digital). This means that after you spend the time to create a good set of tonal adjustments to an image, you can save those adjustments as an Adobe preset. After saving, the preset is available to apply to another picture or a group of pictures. Simply open the picture for development and apply the preset. Finished! Wasn’t that part easy? Once again, Lightroom developers sought to make image work less painful and more fun. Thanks, Adobe.
