When you discuss printing in Adobe Lightroom you are liable to be met with a frown and an immediate discussion of how it doesn’t work the way it should. There are many articles on the web and in publications that deal with printing. These articles give you step by step instructions with Lightroom and generic printers. Sometimes they even give you information on setting Epson printers.
After spending about four hours very late last night attempting to research the proper settings and match paper and ink to the screen, I have found the magic recipe for my printer. Thus, we will discuss the settings for the Epson R2400 to print in Adobe Lightroom using ICM. First, we will discuss the settings so that you can begin to print. Then, while your printer is working through the image, you can read about the research I did. Note that we will discuss black and white settings in another article as I have found those settings much more intuitive and easy to create.
First Things First – Prerequisites for ICM Printing
ICM stands for Image Color Management and uses what are known as ICC profiles. These are calibration profiles developed using standards from the International Color Consortium. For more information on these topics, follow the links provided.
In addition, your monitor must be calibrated. I use the i1Display2 by X-Rite also found as Gretag Macbeth Eye-One color management. The i1Display2 costs about $250US and will calibrate your monitor only – CRT, LCD and Laptop. There are many web sites where you can send a printout from your printer and have them create an ICC profile for you that I cannot justify more money for printing calibration hardware. This product is the best bang for your money.
You must also have ICC profiles for your printer and paper combination. Epson R2400 ICC profiles can be found on Epson’s web site. Download these files and run them to extract the profiles to the proper place on your hard drive. Be sure to download the windows or macintosh versions appropriately.
Finally, your preparation includes being sure you have the most current printer driver. This is important to get new updates and my experience has been this is not done automatically. I purchased an Epson R2400 new in November of 2007. I used the CD included to install the driver. I have yet to receive a notice in windows indicating I have an update ready and I have not been successful determining the version of the software through any of the Epson control panels. That being said, I downloaded and installed the update from the web site and sure enough, it was a new version. The current driver for the Epson R2400 is also on their web site. Be sure once again to choose the appropriate operating system for your computer.
This completes our preparation. Open Lightroom and select an image for printing.
Lightroom Settings for Printing using ICM
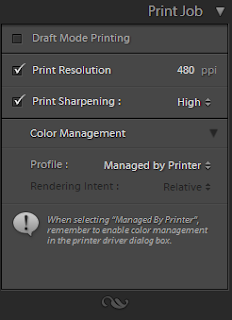
 Lightroom has a relatively simple interface for printing. Setting up the margins and print space in Lightroom goes beyond the scope of this article. We are dealing with only the printer settings. After setting the layout for an image, go to the bottom of the panel and view the Print Job Settings. Here is where we will tell Lightroom how to handle the color management for our image. Note that none of these selections alter what is viewed on the screen.
In order to print, we first set the Lightroom color management to Managed by Printer. This is a requirement. We will still use the ICC profiles, but we will select them through the printer setup.
Epson R2400 Printer Driver Settings
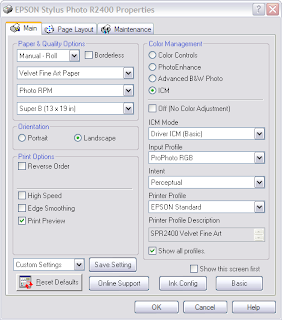
 Next, press the Print Settings button to bring up the printer dialog. Press the Properties button to access the printer settings. In this example we are using 13×19 Velvet Fine Art paper. Set the paper type as shown in the image to the right.
Next, press the Advanced button if you are not already in the advanced mode.

These settings are extremely important. I have not found a reference to these settings in any print book or on the web. I think they are uniquely presented here.
When you open these settings, most of them are already set by default. If not already selected, select ICM color management. The mode should already be set to Driver ICM (Basic) as shown. In addition the intent should be set to Perceptual and the printer profile should be Epson Standard. Ignore the printer profile description for now as you cannot change it anyway.
Now select the check box for Show all profiles. This will enable all profiles on the computer to be available for selection. Use the drop down box under input profile and find ProPhoto RGB. This is the key to printing in Lightroom with the R2400.
Lightroom already uses this color space and although I have not been able to confirm it, if Lightroom is not managing the colors, it stands to reason that the ProPhoto RGB space is sent to the printer driver without manipulation. The results of my prints seem to confirm this is true.
After changing the input profile, the profile description at the bottom should match the ICC profile for the paper you have selected. In this case, our example shows the Velvet Fine Art paper correctly.
Using Print Preview in the Printer Driver Settings
While not required, I am trying to determine how accurate the Epson preview pane is. Thus, I have selected the checkbox for Print Preview. Many sources on the web have said not to trust this preview. However, it appears that the preview will tell you if what is being sent from Lightroom is close to what was on your calibrated (hopefully) monitor. It also appears through trial and error, that the preview will also show the modifications made by Lightroom if you chose to let Lightroom handle the color management. Thus, for now I trust it to show if I am in the right ballpark.
Saving the Preset Configuration in Lightroom
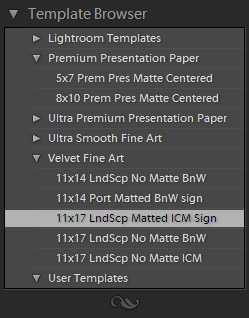
 After making these changes, press the OK button on the printer driver dialog and then again on the printer settings dialog to return to Lightroom. Before doing anything else, save your settings as a preset. I have organized mine by paper type, then size of the print and then whether the print is matted or not. You can easily create folders, save a preset and drag it to your customized folder. These presets save the printer settings so they are important. Creating these settings is beyond the scope of this article and will be covered in a later article.
Press Print
We are now ready to press print! If you have made these changes, your print should come out very close to what is on your screen. This is provided of course you have setup your system and calibrated it correctly. I strongly recommend using the printer preview in the R2400 driver until you feel confident you have your settings correctly. While it may not be a perfect translation, the preview will tell you if you are way off the mark.
Research on Printing in Lightroom
After printing several prints using various settings where Lightroom whereby Lightroom controlled the color management, I gave up. The prints either had such bright saturation that Velvia film looked dark and pale, or the prints contained strong magenta hues. Yes, I had the printer set to ICM and No Color Management. I believe it has to do with the wide gamut of the ProPhotoRGB color space and mapping to the printer driver through Lightroom.
The method I presented above uses the default Lightroom color space and allows the Epson driver to manipulate it. This process has provided very acceptable results to me using the various Epson Fine Art papers. I have not experimented yet with the Luster paper and other vendor’s papers, partly because I try not to switch often between matte and photo black cartridges due to ink waste.
Here are some of the sources I used to arrive at these conclusions:
- O’Reilly had this article on their Inside Lightroom site
- Killer Tips has this printing video
- Photo.net has this forum article
- Open Source Photo had this exchange on their forum
- Adobe uses this link to various printing articles for Lightroom
- Digital Photography Review had this thread on their forum
If you review these many say to let Lightroom manage the color. A few forums suggest we should let Epson manage the color. However, no one suggests that we set the input profile to the same one as Lightroom uses.
Let me know your experiences.
Anonymous
Hi, Thank you so much for the guide. For some reason when printing from Lightroom, I cannot load prophoto rgb as color space in the print dialog. Any idea why or how I can load it?
Thanks!
Outdoor Images
If you are looking for a profile that you cannot find, then be sure to check the box at the bottom of the advanced screen in the printer properties to ‘show all profiles’. This will ensure all the profiles are listed.
See the graphic above and notice how the ‘show all profiles’ checkbox is selected.
Tracy
I too don’t see the ProPhoto RGB selection. I have other icc’s for a bunch of different different papers and sRGB, but no ProPhoto RGB. (the “show all profiles” check box is checked)
Using Vista Home Premium LR 2.5
Is the prophoto rgb profile somewhere I could download it?
Ethan
I have been trying to get a good print from lightroom for 2 years and wasted more ink and paper than I could ever say. Your suggestion to use the ProPhoto RGB fixed it! First print with your print flow was perfect. I have not seen this suggested anywhere else.
Thank you!!!
gg
Hi. Just found this site and already I have 100% improvement in my print from lightroom. I am using the iMac with my r2400. My problem is that I cannot find the PROPERTIES screen. Is this just a Windows screen? I have updated the driver and added all the paper profiles. I just can’t get to find the properties screen. Can you help?
Thanks so much
Gail
Outdoor Images
The images shown in the post were from a windows computer. However, the mac and OS X have slightly different organization. Try opening Lightroom and going to the Print module. Click the print settings button at the bottom left of the screen. When the dialog box appears, make sure you have the right printer selected at the top, and in the drop down select ‘Color Matching.’ Be sure that ‘Epson Controls.’ Finally, in the drop down again, select ‘Print Settings.’ You should see a Basic and Advanced button with all the various choices discussed here.