I keep running across posts where someone wants to crop an image in Adobe Lightroom to a certain pixel size but doesn’t know how to do it or believes it cannot be done within Lightroom. It can be done and you can crop an image to a certain pixel size. Here I will show you how to do it.
Keep in mind that if pixel size is important, then it should be for storing an image digitally. Printing an image to a certain pixel size is a more complex function that needs two variables: pixels in the image and the pixels per inch (or dots per inch) of the printing hardware. We will not be discussing printing images here, only exporting an image to a certain pixel size although this method can be applied to printing with a little more work and a calculator..
In order to export an image to a certain pixel size, use a combination of the cropping tool in the Develop module and the Exporting function under the File menu. First we will review the cropping necessary.
Cropping the Image for a Given Pixel Size
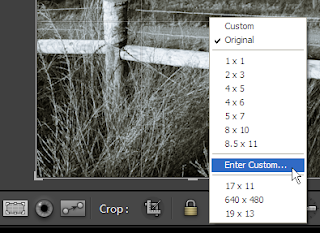
Select an image in the Library module to export to a certain pixel size. Then move to the Develop module and select the cropping tool. Select the aspect menu as shown above and click on the Enter Custom menu item.
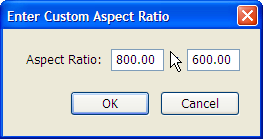
 You will get the dialog box shown at the left. Enter the crop size using the number of pixels to crop the image to. For example, to crop an image as 800px by 600px, enter 800 and 600 in the Custom Aspect Ratio. Note that this will not crop to a certain number of pixels, but it will crop to that aspect ratio. We will set the number of pixels later and using this aspect will avoid distortion or additional cropping of the image.
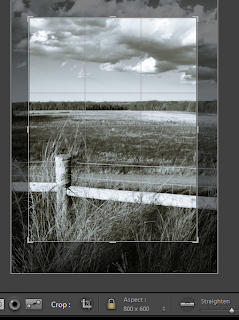
Next, crop the image using the aspect ratio just created. Either crop the image using the default frame size presented in the Lightroom workspace, or adjust the size smaller or larger. Adjusting the size of the crop will not alter our final image because we are setting the pixel size when we export. This step is only to set the correct relationship between height and width so that the final image output will be certain.
Exporting the File for a Given Pixel Size
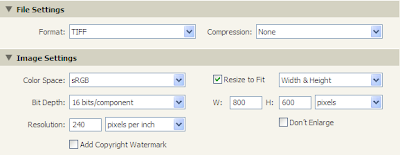
After finishing the cropping, the last step is to export the file. Select the File menu from either the Development module or the Library, they are all the same File menu. Then click on the Export menu item. The dialog box shown will contain a variety of choices to export the image. The two items most important to keep the image a certain pixel size are the File Settings and Image Settings as shown below.
Select the image type to export. Use a JPEG, TIFF or other image type. Note that if you select ORIGINAL, then the Image Settings remain greyed out and cannot be changed. To select the original file type, force the File Settings to that type of image.
Then, using the Image Settings, select the checkbox Resize to Fit and be sure it is set to Width & Height. Then input the same width and height used in the custom crop. For example, input 800 and 600. Be sure the type is set to pixels.
Finally, export the image. This newly created image should be exactly the pixel dimensions input and should, more importantly, retain exactly the cropping that was set in the Develop module.
Conclusion
This method is not limited to pixels. The same concept can be used for inches or centimeters. By choosing the appropriate measurement for the export function that exactly matches the custom crop used, a specific image size can be achieved.
Note that this method also works in the Beta version of Lightroom 2.0. It would be reasonable to expect this will also work in the final version.


Anonymous
thank you thank you thank you for this post!
Michelle Dillon Photography
Thank you for this information. It was very helpful and I’ve been trying to figure this out for a while now.
Anonymous
The Cropping tip is really useful… thanks !