Pages for Black and White with the Fuji X-Series
- Settings for Great Black and White with the Fuji X100s – Part I
- Settings for Great Black and White with the Fuji X100s – Part II (here)
It’s a long time coming, but I wanted too finish the discussion I started about using black and white with the Fuji X100s. I extend this now to really include all the Fuji X series, including the X-Pro1 and the X-E2. If you recall from the first part I tried what others have used by increasing contrast using the red filter option. However, I didn’t like the grey rendering for some colors.
Using color filters for ten years with black and white film, I used the K2 Yellow filter more than any other. I used the light green filter scone most and only rarely used the red filter. There is no question that red produces the highest contrast. However, red also passes red light through as a very light shade of gray and blue light as very dark gray. If most of your photography consists of portraits, the using the red filter will result in artificially light colored lips (red is light, remember?). Landscapes typically turn out more natural which is why the red filter is used most often in landscape work.
So, what is the solution? I proposed in the last article that the yellow filter is my chosen mode. This provides more contrast than normal black and white with no color filter, but leaves the shades of gray perceptually what you expect them to be. For example, lips appear proper shades, green and blue are darker, but not too dark. Yellow is lighter providing some contrast.
Compare the yellow filter to red and I still want more contrast, but not changes in tonal values. After experimenting I have settled on increasing the highlight contrast by one. No other changes. This change boosts the highlights but leaves the darks where they are. Exposing for a middle gray tone is important and in this case I expose just a little darker (under exposing) so I don’t blow the highlights with the extra boost in contrast. However, I’ve found that this setting really lets the lighter side of the image glow.
For example, the image below was shot in the US Virgin Islands on a sugar mill trail. I have posted it before, but have several I want to bring up here as it relates to the black and white settings for the Fuji X-Series. This image is a JPEG straight out of the camera. You can see that the rocks on the trail and portions of the main tree trunk are all nice shades of middle grey. However, see the patch of light coming through on the trail? This is the highlight. If I had taken this image with standard black and white with no changes in highlights, it would be rather grey as well. Here, with the highlights boosted using +1, the white areas seem to ‘glow.’
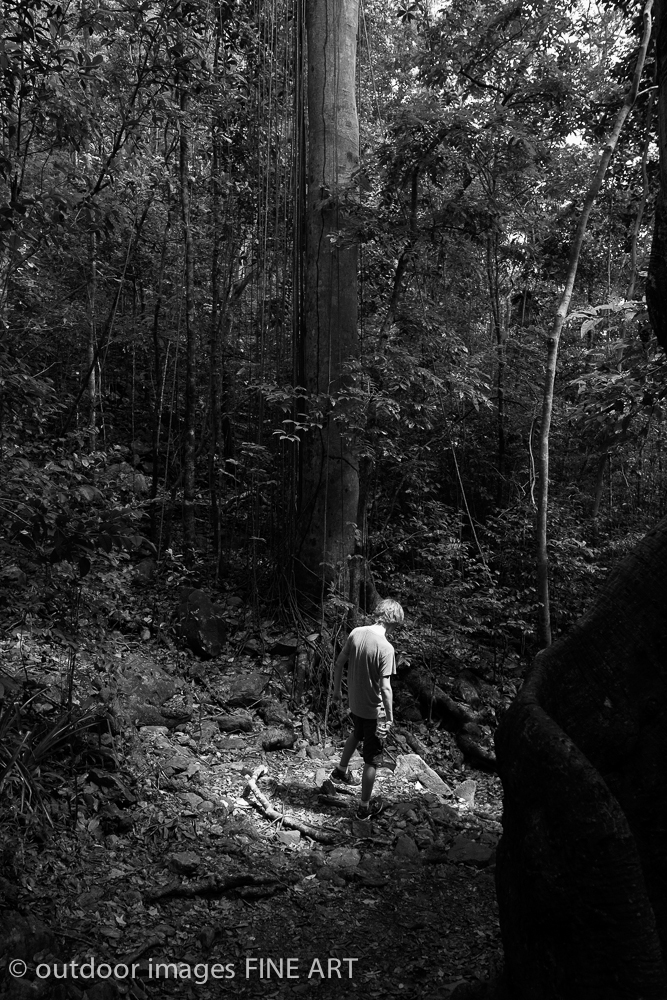
trail illumination – the perfect lighting
Keep in mind a few other things as I suggest this setting is optimal for me. I have had long discussions about why we underexpose digital photography to keep from blowing the highlights, while we overexpose film to capture the shadows. Suffice if for now that the reasons are exactly the same. So, if we inherently try to underexpose, even by 1/3 or 1/2 stop, the highlights may be too low. More importantly, the blacks come out nice and deep because of the underexposure. If you are following me, then you see it makes sense to boost the highlights just a little, back to where we wanted them to start with.
Fuji has done a tremendous job of creating film emulations in their firmware. Many have praised them for the JPEG results that look like the film type they are named after. What many do not realize is the adjustments to the highlights and shadows are equally well tuned. The boost is a very narrow part of the histogram. Part III in this series will show you some of that change. So, if the upper highlights are boosted using a setting of +1 and the rest of the image stays roughly the same, being underexposed, the results are great tonal values, deep blacks and explosive highlights. Again, I keep calling it the Fuji “Glow.”
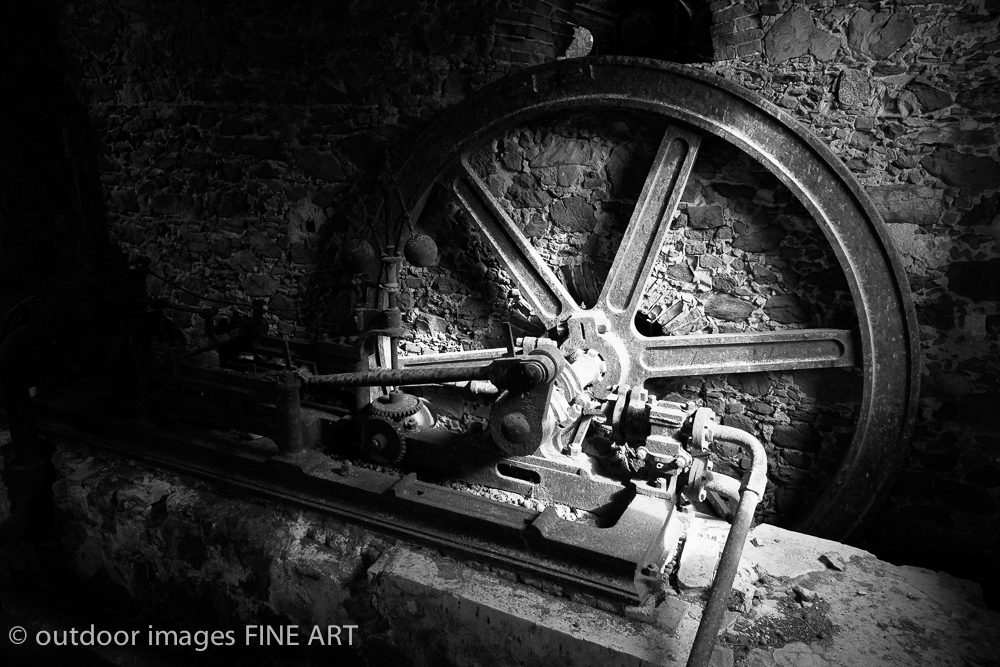
Here is another example. This is from the end of the same trail, at a sugar mill ruin that faces the ocean only yards away. This particular sugar mill was used heavily and then closed down only to reopen as steam engines and gears become the new technology. Unfortunately, it went out of business again. You can image how long ago the structure was built and the fact that it still stands with a roof is tremendous for us photographers! This was a 5 mile hike down the mountain and well worth it.
Here is a small room that houses the internal gear. There was a small window above and to the right of the gear. It was an overcast day, but the light that came in was sufficient to contrast a very dark room with no other sources of light. Here I set the exposure for the right side of the machinery in the front. That is now a nice shade of middle grey. See how the boosting of the highlights gave the central shaft of the gear and part of the machinery a nice Fuji “Glow?”
old processing gears
Another point to keep in mind is that all of this is processed through the X-Trans II (or X-Trans I) sensor, depending on the X-Series model you are using. More importantly, the results of this processing include the RAW image (although it uses a .RAF file extension). This means the RAW image still exists and could be modified to get a similar image to the one above. If this is true, then one might ask, “What is the point of all this work and setting analysis?”
The answer, in my opinion, is easy. All this fancy Fuji technology does not make me a better photographer. The tremendous processing is a tool. The camera is a tool. The lens is a tool. Part of being a great photographer is being able to set an exposure to achieve what you see in mind. So in this case, being able to set the exposure to achieve results like this straight out of the camera is the point. I did not have to manipulate or store the RAW file. If the detail is in the highlights for the JPEG, it is in the RAW file. I saved the JPEG and went on to work with more images. The image below is another such image – no modification from the OOC file.
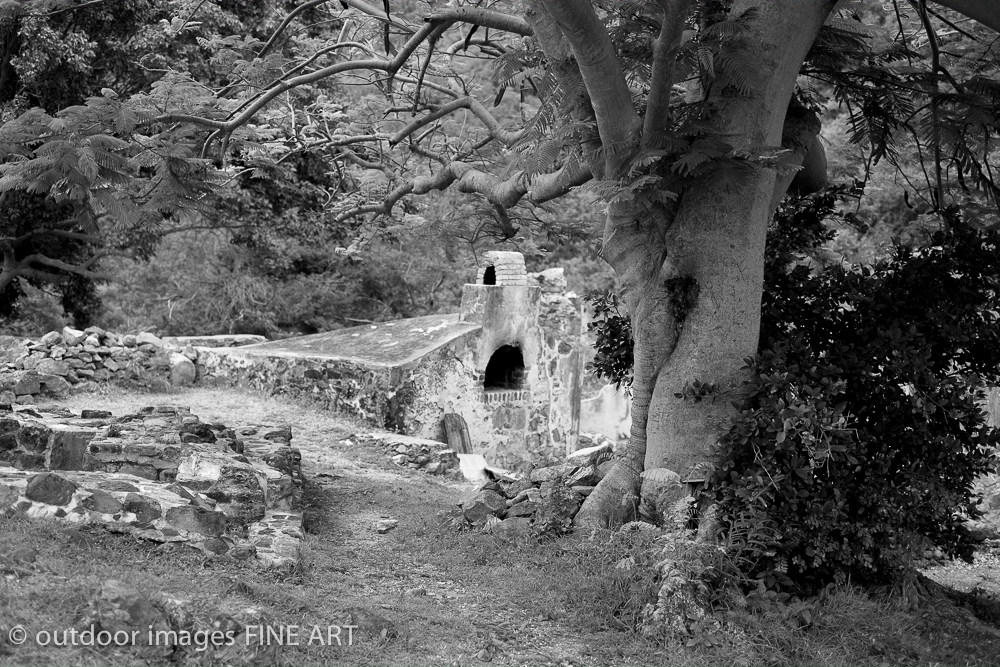
the sugar cane oven
These results are what make the tool such a great experience for me. I know some do not like the constant comparisons to other cameras, but I still believe the Leica makes some of the best glass available for photographers (read – another tool) and their M bodies are much sturdier and more resilient than my Fuji body. The difference is that I get pleasure out the images I can achieve with BOTH systems. Regardless of anything else, I enjoy shooting photographs with the Fuji X-Series and the Leica. I enjoy shooting film through my Leica MP, developing and scanning the negatives. The shot below is a scanned 35mm negative from Charleston, South Carolina – shot with my Leica MP and a Voigtlander 50mm Nokton, new edition.
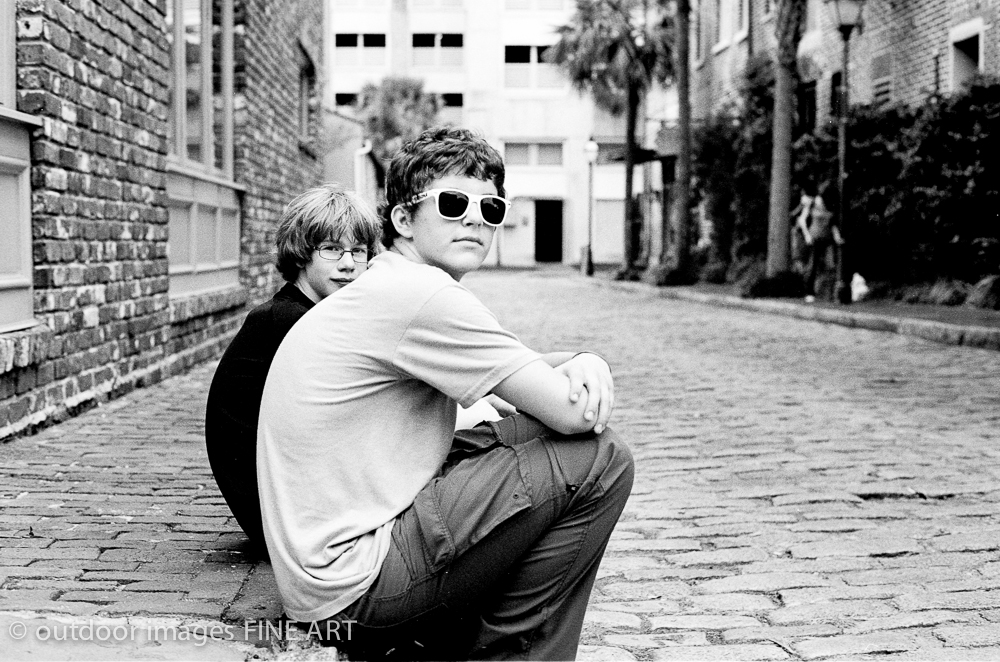
resting after a long walk
The point here is that I believe there is value to being able to use a tool like the Fuji X-Series to create an image that can be used directly out of the camera. This is akin to film photography and the required knowledge and practice needed to perfect the art. This is why photography is the intersection of Art and Science – in my opinion. This is why I will continue the series of creating incredible results through the OOC JPEGs in the Fuji X-Series.
The book I’m working on details more about this idea of using the firmware settings to get unaltered photographs. In this work I actually graph the various options in terms of a density curve like the old black and whit film. The results are interesting and useful. Some things to come include a few additional tweaks on the settings, the results of reverse contrast and a discussion of some benefits shooting the X-Series in black and white.
Thanks for coming back to visit.
mike
Great pics! I have an x100 and added recently the x100s and am in the process of adding an m6 or mp with the Voigtlander 50mm Nokton too. Do you like the lens? Might you have any recommendations either lenses or thoughts on your MP?
thanks
David Knoble
Mike, I love the new design of the Nokton, which I found on Steve Huff’s web site. I bought the brass version as I think it will handle temperature changes better, but my guess is the aluminum version works just as well for most photography. I use the Nokton almost exclusively on the X-Pro1 and X-E2 as it functions great for a portrait lens. I’ve written some here about this lens which you can search for. I also have the Leica 50mm Summilux which I think does better wide open (but you’d probably expect that). So, for the Fuji sensor, it uses the middle of the glass on the Nokton and any edge aberrations are less of an issue. You also asked about the MP. I used both a Leica M-4 and M-6ttl for about 10 years before digital really took off. In fact, the M-4 is what really rekindled my photography. From a build standpoint, the MP is a juiced up M-6 and I think they both work well. You can probably find an M-6 less expensive than an MP (I’d try KEH, Leica Store Miami – used or B&H Photo). If you call Leica Store Miami, ask to speak to Josh – everyone there is great, but Josh has gotten some great equipment for me. I would also look for a used Leica 35mm Summicron ASPH f/2.0. You can get one for a little more than the brass Nokton new and it is also a great lens. If you post some pics, send me the link!
Nicolo Famiglietti
Hi David,
Thanks for this write-up. You’re post caught my eye immediately since I’m a big fan of the great black and white images of the 30s, 40s and 50s. I shoot mostly in color but also occasionally in black and white when I feel the moment is right.
Images 1, 3, 5, 8, 9, 10 and 11 in the gallery titled “Guanajuato, Mexico in Black and White” were all captured using the built-in red filter on the Fujifilm X-E1. Your feedback is welcome.
http://eyeniccolo.photoshelter.com/
Nick
David Knoble
Very nice shots Nicolo! I see some of your work is for sale, so I approved this comment so others may find you. I noticed your images 2 and 6 where not using the red filter (as you indicated in your comment) and those portraits came out well. I do think the red filter would have ‘monkeyed’ with the lip and skin colors more than I would have wanted, IMHO. Very nice work and very nice web site design. What type of post processing did you use on those Fuji black and whites?
Nicolo Famiglietti
David,
I used minimal processing on these images: upped the contrast, sharpness and clarity a bit and that’s about it if I recall correctly.
Thank you for bringing the red filter/lip and skin color problem to my attention. It’s something I’ll pay close attention to in the future. Again, thanks for your helpful and informative post.
By the way, in the Portland Oregon gallery on my site are four images (1,2,3,5) where I used the default black and white setting on the Fujifilm X-E1. I thought those came out quite well. See if you agree.
http://eyeniccolo.photoshelter.com/
Nick
David Knoble
Nicolo, those are great shots! The black and white results of the Fuji X-Series clearly provides the same high levels of tonal range and beauty that the color film modes provide. It is one of the great aspects Fuji incorporated into their X-Trans sensor and RAW converter. I would encourage you to experiment by taking an image using the default black and white setting and then comparing the same image taken with a +1 highlights setting. You’ll find the whites are boosted enough to add a whole new dimension. Great work!
Nicolo Famiglietti
Thank you for the tip, David. I will definitely try the +1 highlight setting.
Helen
Really useful and interesting article. Thank you very much.
Don
Hi David,
Thanks for this really useful article. I’m a Fuji X user, but as a busy father I don’t really have time to spend manipulating raw files very often. I’d also much rather concentrate on getting a good image in camera than worry about the technical aspects. I’m going to try your B&W settings as they look great.
Cheers,
Don
David Knoble
Don, Thanks! That’s how I feel sometimes! I have two teenage boys that keep us busy as a family. This summer I culled about 1,800 images from a weeklong vacation down to 180 that I put in a blurb book. About 80% of those were JPEG straight out of the camera. It made getting this book done for everyone to enjoy (and Christmas presents) much less time consuming… Good luck!
Ben
David – couple of really interesting articles on B&W with the Fujis. I also found Kevin Mullins blog and his documentary wedding stuff is great. You however seem to be the first person not trying to ape tri-x!
Quick question. Your +1 highlights (you are absolutely the first person I have seem suggesting it) is that still on the yellow filter setting?
Cheers
Ben
David Knoble
Ben, thanks! The short answer is ‘yes’ I use the black and white setting with the yellow filter. For me, the yellow filter provides a good contrast between some basic colors – more so than the standard black and white setting. The +1 contrast, you can see with my examples, really makes the image pop. I have used the black and white green filter with the same +1, but mostly for outdoor shots with a lot of trees and brush (i.e, green). Hope this helps!
romi.foto
before i read where the shot of the two boys was at, it reminded me of a photo i took when i was in downtown charleston. surely enough, that’s where it was at, on that very same street.
i’ll be trying out this b&w setting for my street photography to see how i like it. i’ve always been using the red filter, shadow +2, highlight +1. yes, that contrasty. but i’ve been wanting some grey tones. we’ll see…
May P
Hi David, other than Hilights +1 , would you please share what are other setting ? or you leave them at default ? Very nice photos , I want to try … Thanks
Glenn B Miller
I’m wanting more of a deeper, Roy DeCarava kind of look. What do you think of yellow, -2/3, -1 shadow, +1 highlight as a starting off place? Or would you immediately go to +2 highlight and perhaps under expose even more?
David Knoble
One of the great features of the Fuji X-series is the ability to re-process the JPEG file within the camera. To do this, you still need to shoot a raw file. I’d would have to experiment, but using +2 in the highlights may end up underexposing the RAW file so much that you loose detail in the shadow. If you want high contrast and the shadows are unimportant, this will not matter. If you are hoping to bring out that detail, then it has to be present in the RAW file for the +/- shadow settings to work. I would consider staying in the +1 setting for highlights…
Steve Rosenblum
Thanks so much for publishing this information as well as your other posts on in camera settings for the Fuji X-Tran cameras. I really appreciate it! I will give the BW/Yellow filter setting with +1 highlights a try later today with my x100s.
Peter Funch Kofod
Please bring us part III
David Knoble
On the way!
Birger Falch-Pedersen
Informative article and I am impressed on the Scientific approach.
I also Wonder, what metering methode do you use?
David Knoble
Good question. Since I use various Leica camera bodies and the original Leica metering was a center-weighted method, I use the same with the Fuji series. I can adjust the metered value for dark and light subjects easily since I am used to this method. However, I have seen some very successful work using the spot-metering methods. I use a Sekonic light meter as well which has a spot meter that stems from my long time black and white film work. Ultimately, those that use any sort of automated setting with the Fuji will have problems using spot metering, because the average luminosity is not typically in the center of the frame…
Tommy Moore
Hi David,
Thanks for sharing the tip regarding highlights. What dynamic range setting do you prefer on the Fuji?
David Knoble
Tommy, thanks for commenting! I use the standard dynamic range setting. I’ll look for the link, but someone did some deep research into the dynamic range, and my recollection was that it was effectively the same as changing ISO and leaving everything else the same. I wanted a little more control over my exposure so that I only had to think in terms of adjusting one item…. What are you using?
Tommy Moore
I started out using 200% DR but switched to auto as of late. The x100 seems to do a good job handling this parameter. I’m curious as to how the camera will handle DR with the highlights set to +1 and underexposed.
Tommy Moore
I have been using the auto setting as of late. Camera seems to handle this duty with good results.
David Knoble
Great! The other easy way to compare is to use the ‘Q’ button when previewing an image and change some parameters to view the results. Fuji have done a tremendous job with their in-camera RAW processor and given us the ability to take an image and decide later, in-camera to adjust the resulting JPEG. Very interesting idea to adjust the DR!